If you’ve ever wished your WordPress site could answer questions 24/7, qualify leads, or help readers find the right content without you sitting at your desk… an AI chatbot is exactly what you need. So in this article, we’re going to introduce you to the best free chatbot plugin for WordPress!
In this guide, you’ll learn step-by-step how to add a free AI chatbot to WordPress using the KimaAI plugin:
- ✅ The plugin itself is free
- ✅ No KimaAI account needed for the free version
- ✅ Works with powerful AI providers like OpenAI and others
We’ll use:
Important: The plugin is free, but AI providers like OpenAI may charge for usage. You’ll bring your own API key and pay them directly (often very cheap for small sites).
Table of Contents
What is KimaAI?
KimaAI is an “all-in-one” AI plugin for WordPress that lets you:
- Add an AI chatbot / assistant to your site
- Connect to multiple AI providers (OpenAI, Replicate for images, etc.) – Gemini will be added soon as well
- Use advanced features like content awareness, so the bot can answer questions based on your own pages and posts
On top of that, there’s a highly featured free version you can install directly from your WordPress dashboard, and you don’t even need to sign up for a separate KimaAI account to start using it. So, in short, KimaAI is the best free chatbot plugin for WordPress!
How KimaAI’s cost model compares to other chatbot plugins
Most WordPress chatbots fall into two camps:
- Free / “bring your own API key” (like KimaAI)
- KimaAI is a free WordPress plugin. You install it from WordPress.org and connect your own AI API keys (OpenAI, etc.).
- You don’t pay KimaAI a monthly fee for the free version; you only pay the AI provider based on usage (tokens/requests).
- For small or medium sites, that often works out much cheaper than a flat subscription, because you only pay for chats your visitors actually have.
- Monthly subscription chatbots (SaaS)
- Tools like Tidio and ChatBot com charge recurring fees, e.g. Tidio’s paid plans start around $29/month+ and scale up to hundreds per month, while ChatBot com starts at about $52/month for its Starter plan.
- These usually bundle hosting, dashboards, analytics, and sometimes a CRM—but you’re locked into their pricing tiers and conversation limits.
In short:
If you want a budget-friendly, flexible AI chatbot and don’t mind creating your own OpenAI (or similar) account, KimaAI’s free plugin + pay-per-token model is ideal.
What you need before you start
You’ll need:
- A working WordPress website
- Admin access to the WordPress dashboard
- An AI provider API key (we’ll use OpenAI as the example)
That’s it.
Step 1 – Install the free KimaAI chatbot plugin
You can install KimaAI directly from your WordPress admin in a couple of clicks.
- Log in to your site: Go to
your-site.com/wp-admin. - In the left menu, go to Plugins → Add Plugin.
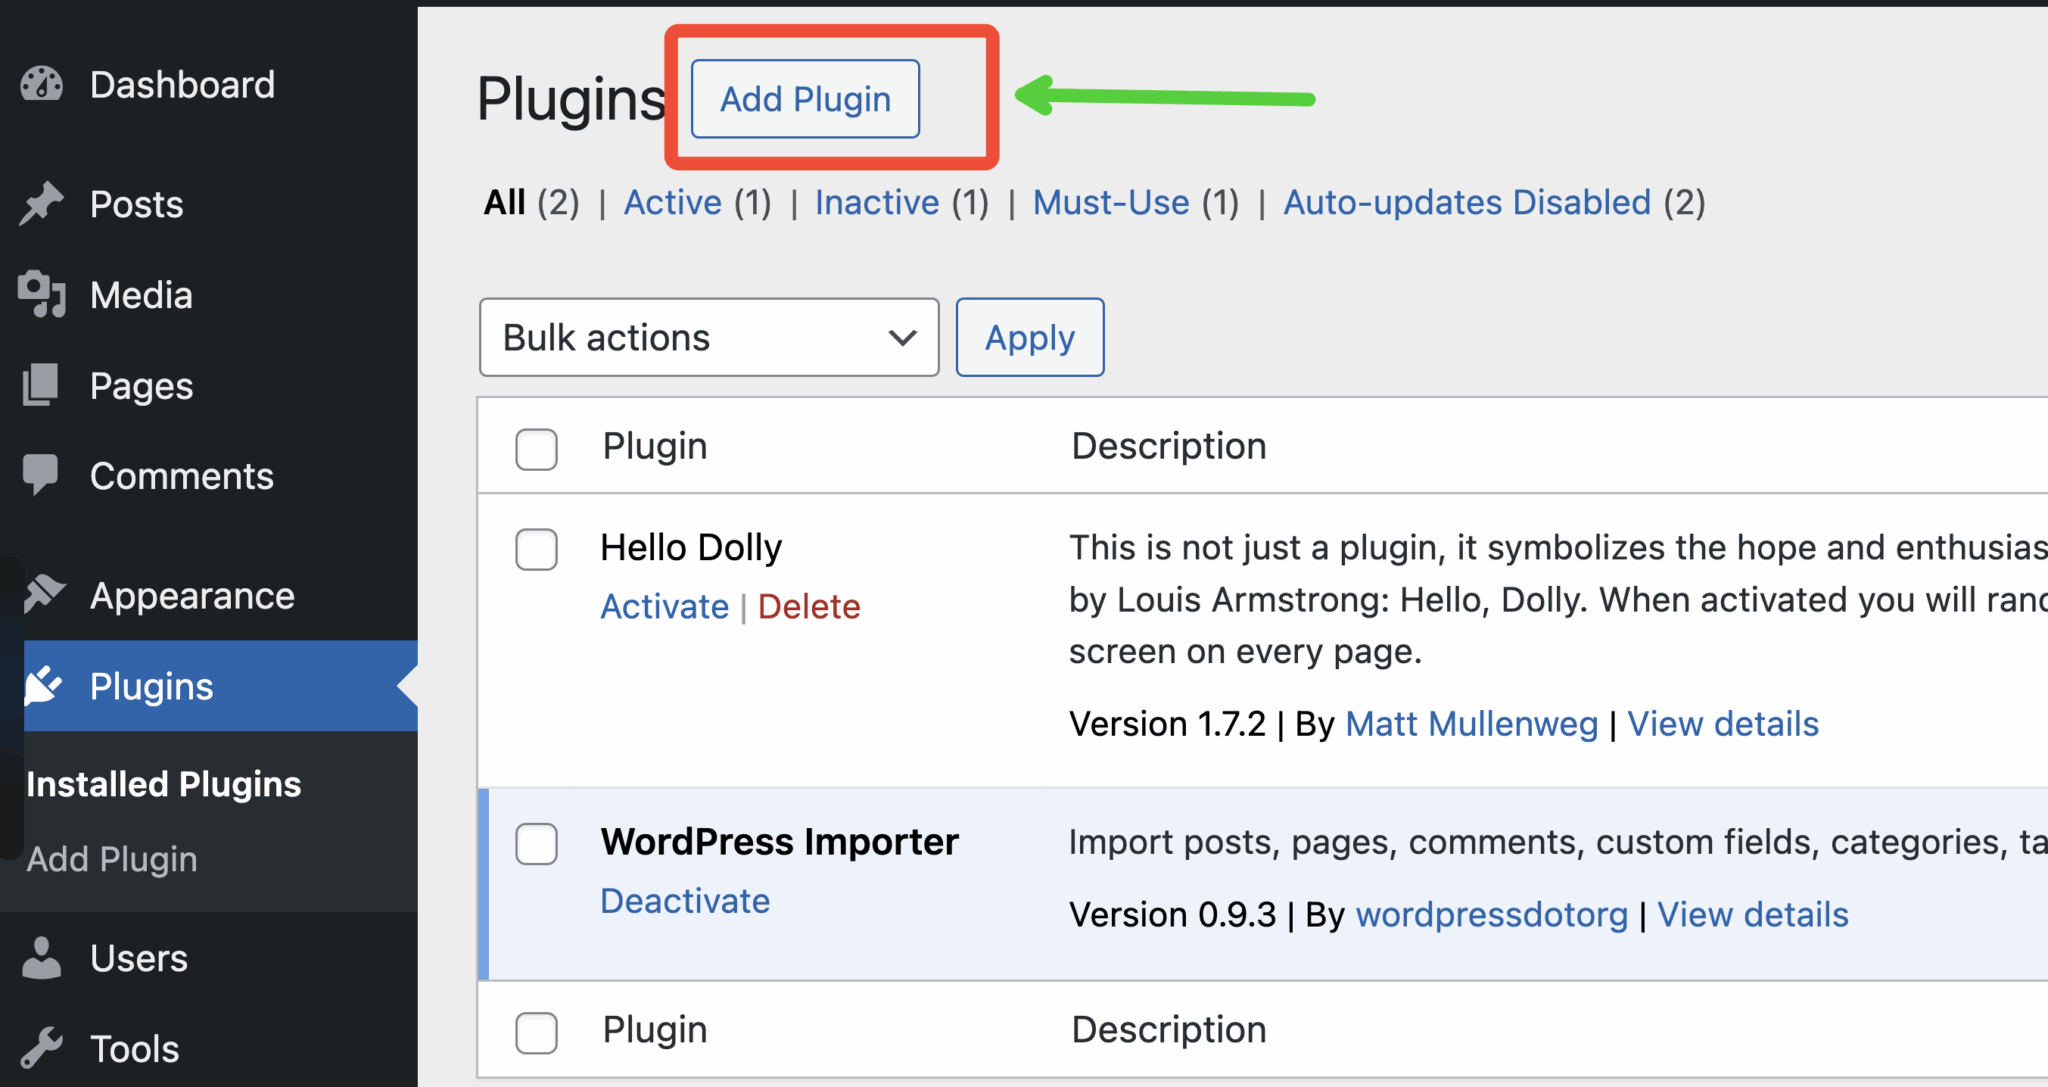
- In the search bar, type “KimaAI”.
- Find “KimaAI | AI Chatbot, ChatGPT content writer and more” and click Install Now.
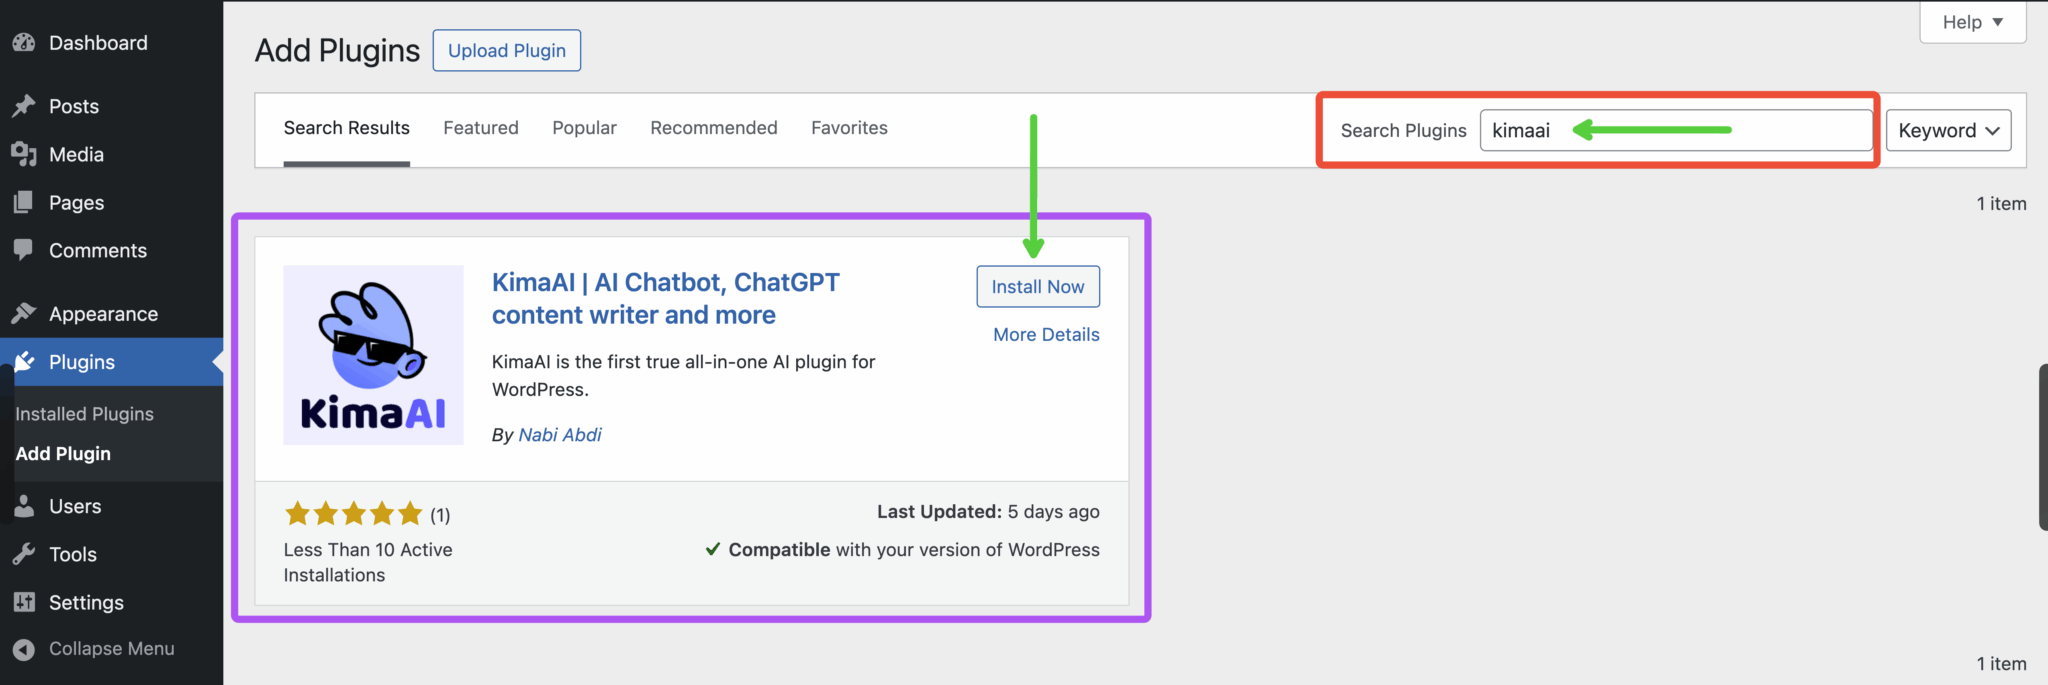
- Then click Activate.
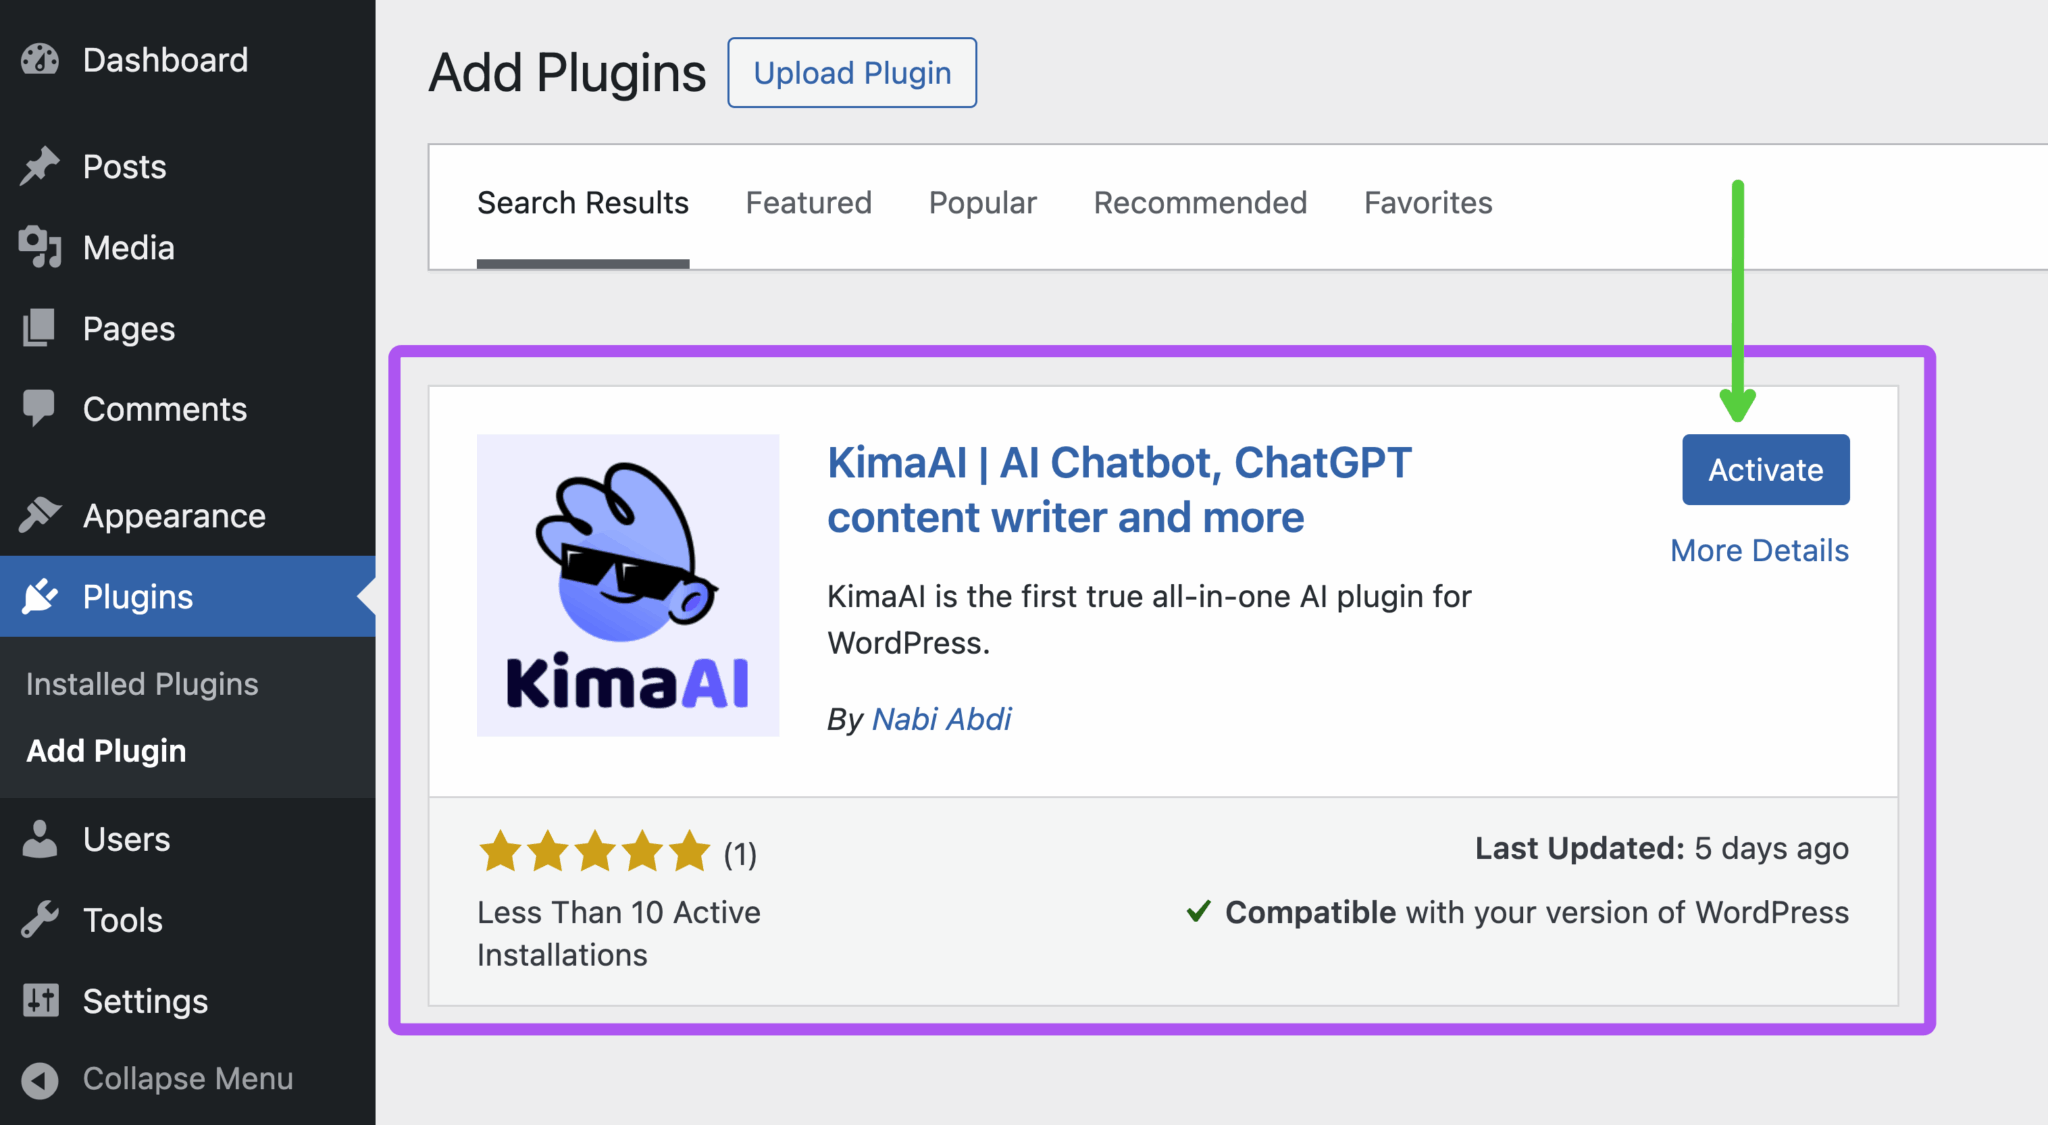
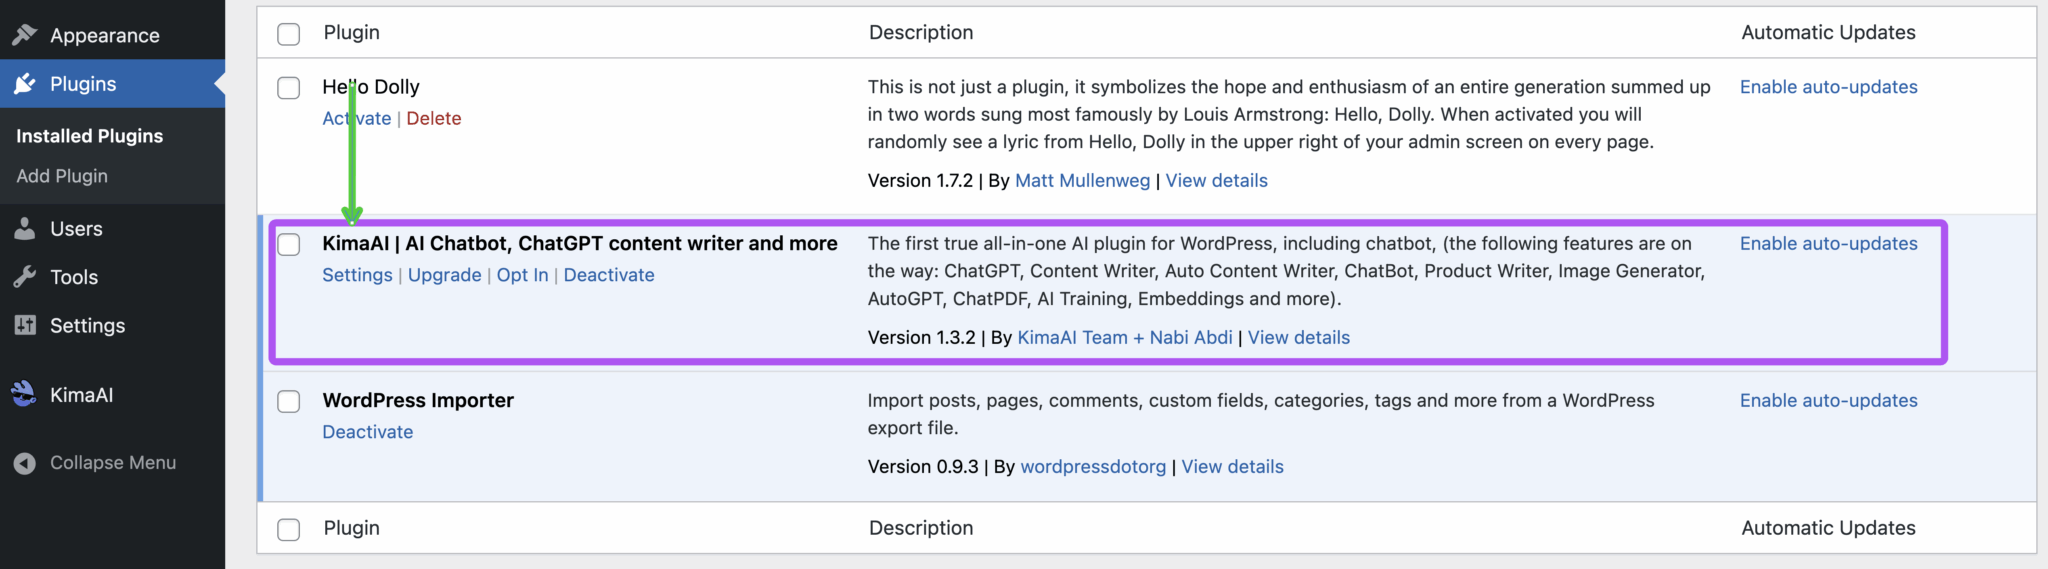
You’ve now added the plugin to your site. 🎉
If you prefer, you can also → go to the plugin page on WordPress.org, download the ZIP, and upload it manually via Plugins → Add New → Upload Plugin.
Step 2 – Get your OpenAI API key (or another AI provider)
KimaAI connects your website to AI services — it doesn’t run the AI itself. That means you need your own API key from OpenAI (or another supported provider).
For OpenAI, the process is roughly:
- Go to the OpenAI platform and create an account.
- In your OpenAI dashboard, generate a secret API key.
- Copy the API key somewhere safe — you’ll paste it into the KimaAI plugin settings page in WordPress in the next step.
KimaAI’s documentation and plugin page explicitly remind you to follow each provider’s Terms of Service and privacy rules and to keep an eye on your usage. (WordPress.org)
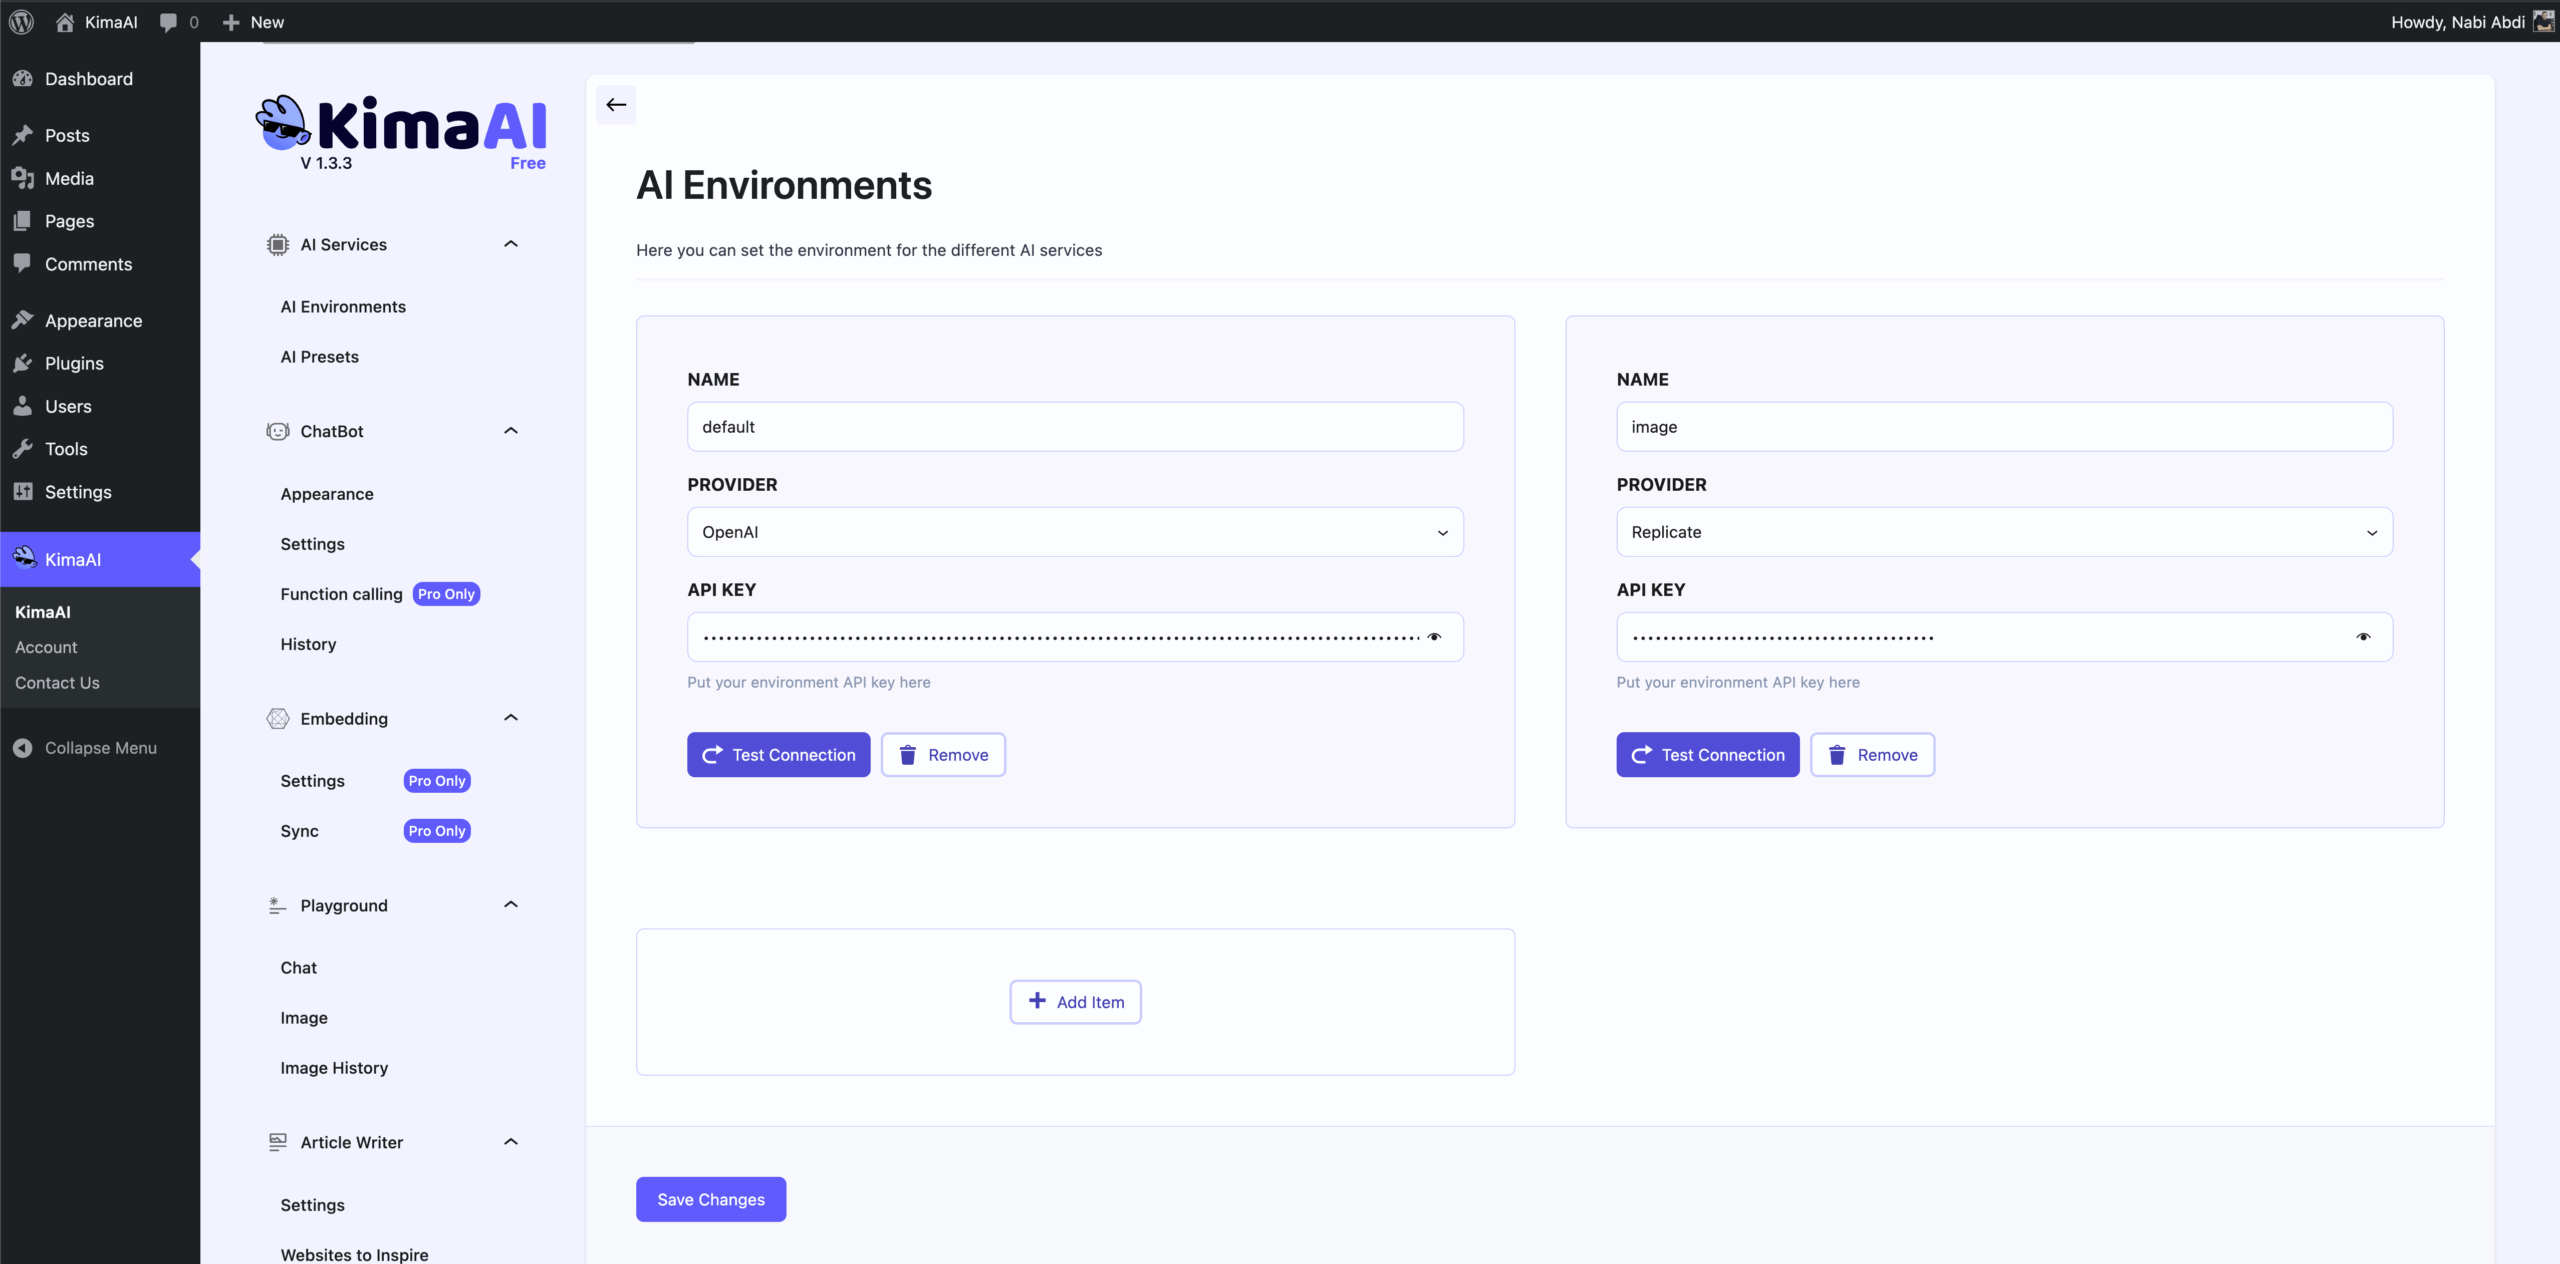
Step 3 – Configure KimaAI in WordPress
Now let’s plug everything together.
- In your WordPress dashboard, go to Settings → KimaAI (or a “KimaAI” item in the left menu, depending on your version).
- On the Settings page you’ll see fields to:
- Choose AI provider & model – e.g., OpenAI GPT-4 / GPT-5 / reasoning models, or other supported providers.
- Paste your API key from OpenAI
- Optionally use the “Test connection” button to confirm the key works before going live.
- Look for the Chatbot (or “AI Assistant”) tab/section in the KimaAI settings. There you can typically:
- Enable / disable the chatbot
- Set chatbot position (bottom right, bottom left, etc.)
- Pick chat icon and colors to match your brand
- Configure greeting text and basic instructions (e.g. “You are a helpful support assistant for [Your Brand]”)
- Turn on options like:
- GDPR consent
- Maximum number of messages
- Max input length
- Content awareness (how much of your site content the chatbot considers)
- Moderation features like banned words and banned IPs
The free version’s settings screen already lets you configure a fully working chatbot and looks similar to the screenshot you can see in the following:
Don’t forget to click Save Changes when you’re done.
Step 4 – Display the chatbot on your site (widget & shortcode)
Once KimaAI is configured, you have two main ways to show the chatbot:
4.1 Floating chatbot bubble (site-wide)
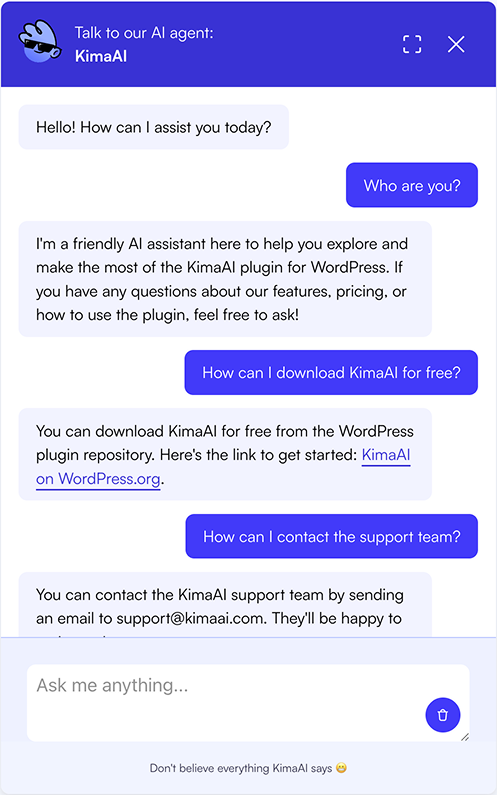
KimaAI includes a built-in floating chat widget, so in many cases you don’t have to embed anything manually:
- When the chatbot is enabled in the KimaAI settings, a small icon/bubble appears (usually in the corner of your site).
- Visitors click it to open the full chat window and start talking to your AI assistant.
This is the easiest “just works” option for most websites.
4.2 Embed the chatbot with a shortcode
If you prefer to place the chatbot inside a specific page or section, KimaAI chatbot plugin provides a shortcode:
[kimaai_chatbot]This shortcode was added in version 1.0.5 and lets you drop the chatbot into any post, page, or widget area.
To use it:
- Edit the page or post where you want the chatbot.
- Add a Shortcode block (in the block editor) or paste it into the classic editor.
- Update / publish the page and visit it on the front-end — the chatbot will appear in that location.
You can combine this with the floating bubble (or disable the site-wide bubble and only use the embedded version, depending on your design).
Step 5 – Test your new AI chatbot
Before sending real visitors to it, test the chatbot yourself:
- Open your site in an incognito/private window (so you see it like a fresh visitor).
- Click the chat icon or open the page where you embedded the chatbot via the shortcode
- Ask common questions your users might have:
- “What are your opening hours?”
- “Where can I find pricing?”
- “How do I contact support?”
- Watch how the bot responds:
- If you have enabled content awareness, verify that it correctly refers to your existing pages and posts.
- If something sounds off, tweak the instructions / system message in the KimaAI settings so the bot behaves more like a support agent, salesperson, tutor, etc.
Step 6 – Fine-tune safety, privacy & UX
KimaAI includes several options to keep your chatbot safe, compliant, and pleasant to use:
- GDPR Consent – Ask visitors to consent before using the chatbot if you’re in a region that requires it.
- Banned words / IP addresses – Block abusive content or known problem IPs.
- Max messages per visitor – Prevent spammy or heavy usage from a single user.
- Max context length – Control how much of your site’s content is fed into the AI for answers.
- Color + theme controls – Use the KimaAI theme customization and color pickers to blend the chat widget with your brand.
You’ll also see a disclaimer area in the settings and in the chatbot footer, reminding visitors that responses are AI-generated — a nice touch for transparency.
And always keep an eye on your OpenAI (or other provider) usage dashboard so you understand your costs as traffic grows.
Is it really “free”?
Here’s the honest breakdown:
- ✅ KimaAI plugin – Free to download and use from the WordPress.org repository and via your dashboard.
- ✅ Free KimaAI plan – No separate KimaAI sign-up required for the basic free chatbot, according to their “Best Free Chatbot Plugin” page.
- 💳 AI provider usage – You pay OpenAI / Gemini / others directly for the AI API calls (some offer free tiers or credits). KimaAI is just the bridge between WordPress and those services.
So yes, you can add an AI chatbot to WordPress without buying a premium plugin, and for low-traffic sites, the actual AI usage cost can be close to nothing — especially if you’re just getting started.
Quick troubleshooting tips
If something doesn’t work:
- Chatbot not showing up?
- Check that the chatbot is enabled in KimaAI settings.
- Make sure you haven’t set conditions that hide it (e.g., position off-screen).
- “No API key” or connection error?
- Look for KimaAI notices in the WordPress admin; the plugin shows a “no API key” warning and provides a Test connection button in settings.
- Responses are weird / off-topic?
- Refine the chatbot instructions (tell it clearly what role it plays and what it should focus on).
- Enable and tune content awareness, so it uses your own pages as context.
- Worried about performance?
- KimaAI mostly calls external APIs; the plugin includes ongoing improvements to performance and styling, as seen in its changelog.
Final thoughts
That’s it — you’ve just learned how to add an AI chatbot in WordPress free using the KimaAI plugin:
- Install & activate KimaAI
- Get an OpenAI (or other) API key
- Configure KimaAI settings and chatbot behavior
- Show it via the floating widget or shortcode
- Test, tune, and monitor usage
With just a few clicks and minimal configuration, you can give your visitors a smart assistant that’s always awake, always helpful, and always on-brand.