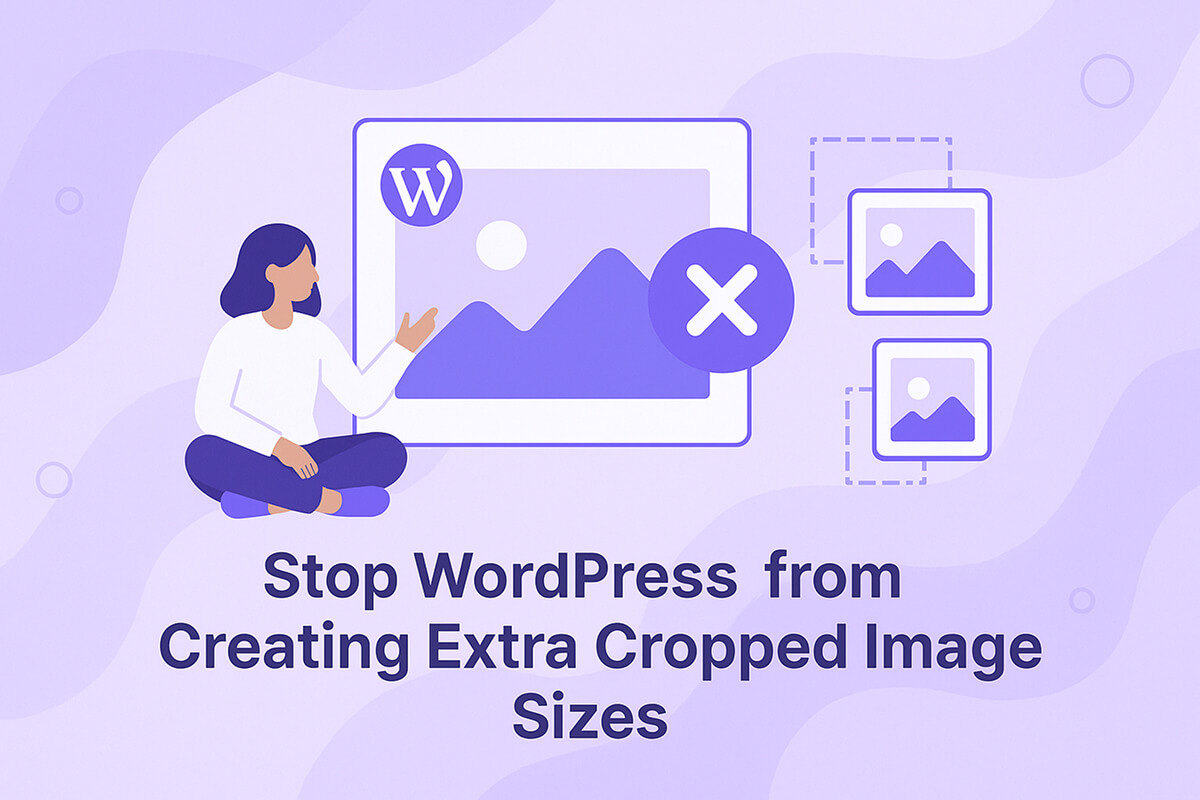
Every time you upload an image to your WordPress site using the media library, WordPress automatically generates several additional versions of that image in various sizes. If you don’t actually need these extra images, they can take up unnecessary server space and make your site backups larger than they need to be.
This tutorial will cover default WordPress image sizes, why extra images are created, how to identify registered image sizes, and provide code snippets so you can prevent your site from generating unwanted image sizes.
Table of Contents
Default Image Sizes in WordPress
Below you’ll find a breakdown of WordPress’s default image sizes:
| Name | Default Size | Description |
|---|---|---|
| thumbnail | 150×150 | User-defined thumbnail size. |
| medium | 300×300 | User-defined medium size. |
| medium_large | 768×0 | Optimized for responsive displays and HDPI devices. |
| large | 1024×1024 | User-defined large size. |
| 1536×1536 | 1536×1536 | Geared toward retina and high-resolution screens. |
| 2048×2048 | 2048×2048 | Suited for very large displays. |
| -scaled | ~2560 | Created when uploads exceed the big image size threshold. |
| full | – | The largest available size, either the original or scaled image. |
That’s quite a few variants!
Each image you upload can result in up to 7 extra image files being saved, and this doesn’t include additional image sizes added by your theme or plugins.
Image Sizes Created by Your WordPress Theme & Plugins
Many traditional WordPress themes (non-block-based) often define their own image sizes instead of relying solely on the core thumbnail, medium, and large sizes. These custom sizes are often tailored to match the theme’s design and layout.
Plugins can also register their own image sizes, especially those handling custom post types or image-heavy content such as directories, event calendars, ecommerce, learning management tools, or page builders.
In other words, the image size bloat can increase rapidly, potentially filling up your server and inflating backups.
It’s a good practice to consult your theme and plugin documentation to check which additional image sizes are being created, and see if they allow disabling or editing those sizes. Most quality themes and plugins offer controls to adjust or turn off extra image sizes.
If you’re a developer, later in this guide you’ll find a simple approach to display all registered image sizes on your website via code.
Why are Extra Resized Images Created
Before we dive into preventing WordPress from making extra image sizes, let’s quickly look at why it happens to begin with:
- Faster Loading Times: Smaller images load more quickly, improving site performance.
- Responsive Images: Multiple sizes adapt to different screen sizes and devices.
- Consistency: Ensures all featured images look uniform across your content.
- High-Resolution Displays: Supplies alternate images for sharpness on retina or HD screens.
- Featured Thumbnails: Different images for specific theme or plugin elements.
- Server Performance: For example, the -scaled image is automatically managed for system efficiency.
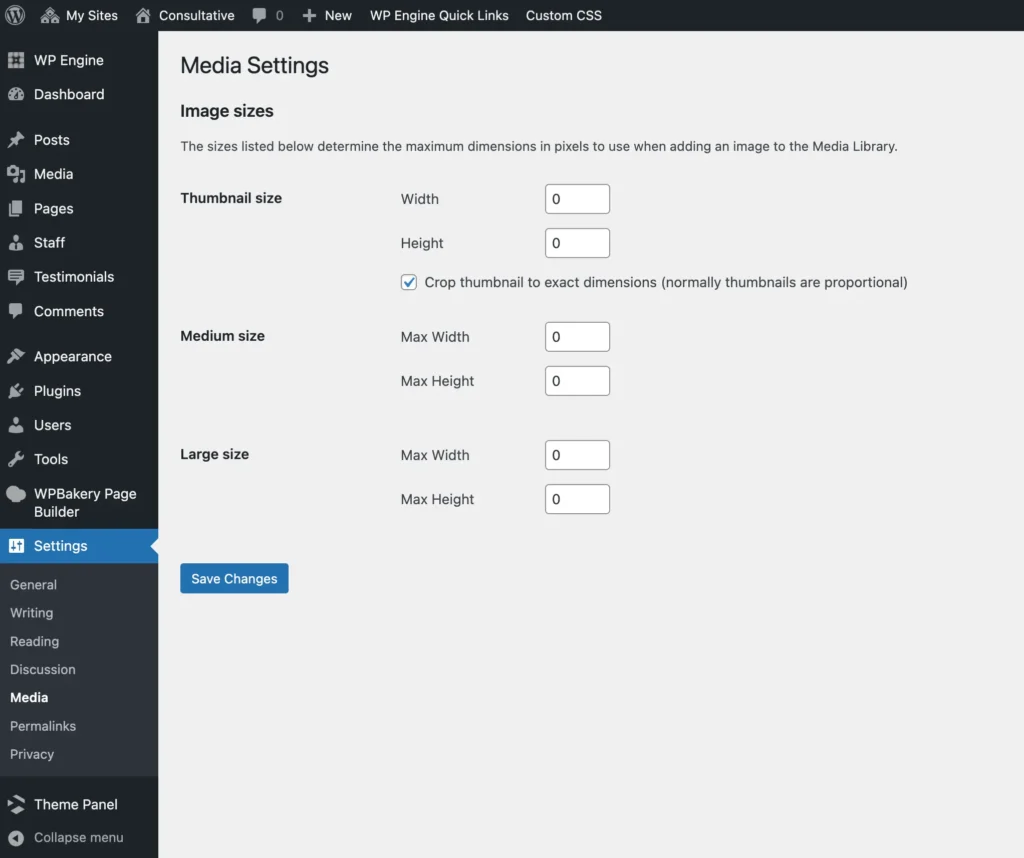
WordPress Media Settings Admin Panel
Inside your WordPress site, navigate to Settings > Media to adjust the core image size settings: Thumbnail, Medium, and Large.
Setting all the width and height fields here to 0 will stop WordPress from generating those specific extra image sizes. This step is a quick and common practice right after installing WordPress, and works well for many site setups.
Still, this method doesn’t catch every resized image. Keep reading to learn more and get the code solution to completely disable extra image sizes.
The Big Image Size Threshold in WordPress
Since WordPress 5.3.0, the Big Image Size Threshold has been a built-in feature. It sets the maximum width or height (default is 2560 pixels) for images uploaded to the media library. If an image exceeds this size, WordPress automatically scales it down and generates all defined image sizes based on the reduced version.
So, if you upload images larger than 2560×2560, WordPress will make additional copies. You may want to adjust or turn this feature off based on your site’s needs.
Disable the Big Image Size Threshold
To allow uploads of large images without automatic downscaling or extra copies, use this snippet:
// Disable the big image size threshold
add_filter( 'big_image_size_threshold', '__return_false' );Warning: The big image threshold helps protect your site from performance problems due to massive images. It’s not recommended to disable it unless you’re sure only appropriately sized images will be uploaded.
Modify the Big Image Size Threshold
If you need larger uploads (for example, for a photography portfolio), you can raise the maximum value. Here’s how to adjust it from 2560 to 5000:
// Modify the big image size threshold
add_filter( 'big_image_size_threshold', function( $threshold ) {
    return 5000;
} );
How to Check what Image Sizes are Defined on Your Site?
WordPress doesn’t offer a built-in option to list every registered image size. While some plugins can do this, here are coding solutions to quickly view all image sizes in your installation.
Quick & “Dirty” Method
Paste this code into your theme’s functions.php file and refresh your site—now you’ll see a list of image sizes right on your site. After copying the info, be sure to remove the code.
// Display all defined image sizes at the top of the site inside a <pre> tag
add_action( 'wp_head', function() {
	echo '<pre>';
	foreach ( (array) wp_get_registered_image_subsizes() as $size => $dims ) {
		$width = $dims['width'] ?? 0;
		$height = $dims['height'] ?? 0;
		echo "{$size}: {$width}x{$height}n";
	}
	echo '</pre>';
} );
Display Registered Image Sizes in the WP Admin
For a more elegant approach, you can show all defined image sizes in the WordPress admin. This is handy when adding new plugins or switching themes and wanting to verify new sizes being registered.
This code will add a table of all image sizes at the bottom of Settings > Media:
// Add a table of image sizes to the Settings > Media admin page
add_action( 'admin_init', function() {
	add_settings_section(
		'dummy_registered_image_sizes_info',
		esc_html__( 'Registered Image Sizes', 'text_domain' ),
		function() {
			echo '<table class="wp-list-table widefat fixed striped">';
			echo '<thead><tr><th>' . esc_html__( 'Name', 'text_domain' ) . '</th><th>' . esc_html__( 'Dimensions', 'text_domain' ) . '</th></tr></thead>';
			foreach ( (array) wp_get_registered_image_subsizes() as $size => $dims ) {
				if ( ! in_array( $size, [ 'thumbnail', 'medium', 'large' ], true ) ) {
					$width = $dims['width'] ?? 0;
					$height = $dims['height'] ?? 0;
					echo "<tr><td><strong>{$size}</strong></td><td>{$width}x{$height}</td>";
				}
			}
			echo '</table>';
		},
		'media'
	);
}, PHP_INT_MAX );
This snippet creates a section in your media settings page, displaying registered sizes as a table.
Here’s what this looks like in practice:
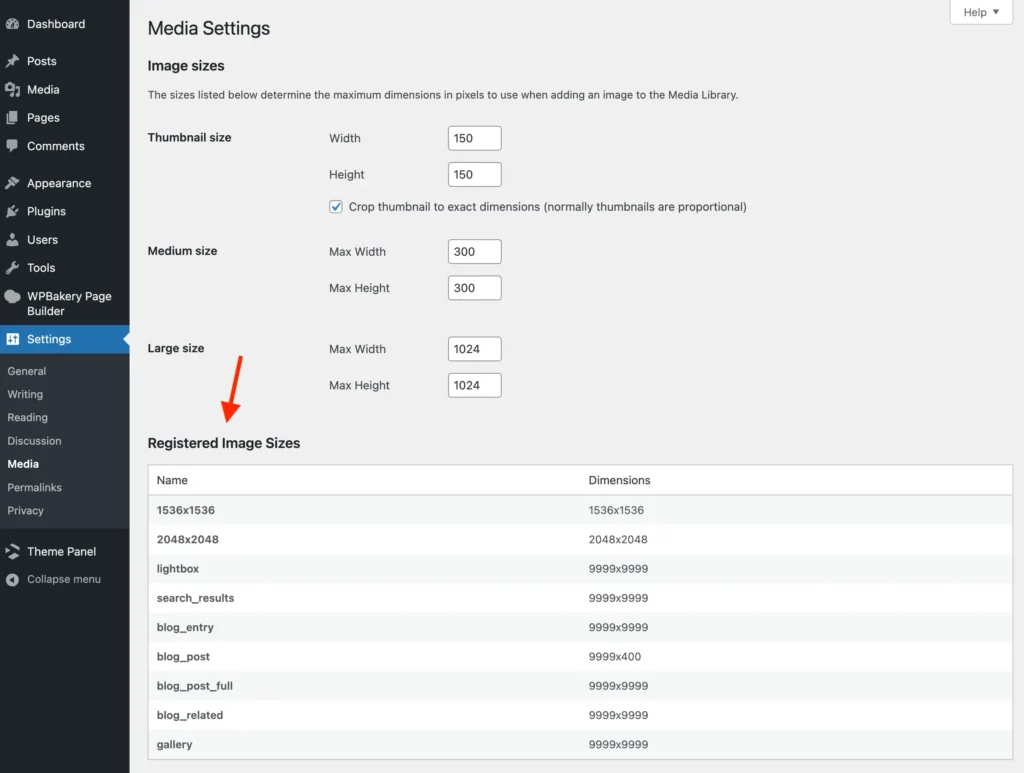
In this example, the theme sets default image sizes to an intentionally high value (9999×9999), so they’re never actually cropped.
Prevent WordPress from Creating Extra Image Sizes
There isn’t a built-in toggle for this, so disabling automatic cropping requires a code tweak. The following single line stops WordPress from creating additional cropped image versions:
// Return false for calculated resized image dimensions
add_filter( 'image_resize_dimensions', '__return_false' );
Here, we’re tapping into the core image_resize_dimensions() function. Essentially, by hooking into its filter and returning false, WordPress won’t calculate or create the additional versions.
Optimized Code Snippet
The previous method halts cropping globally. For an even neater solution, use the intermediate_image_sizes_advanced filter to control which types are created at upload:
// Return an empty list of image sizes to generate on upload
add_filter( 'intermediate_image_sizes_advanced', '__return_empty_array' );
Returning an empty array here tells WordPress not to create any extra images on upload—the original file is all that gets saved.
Complete Example:
Here’s how you can combine both approaches:
// Return false for calculated resized image dimensions
add_filter( 'image_resize_dimensions', '__return_false' );

// Return an empty list of image sizes to generate on upload
add_filter( 'intermediate_image_sizes_advanced', '__return_empty_array' );
If you’re using the intermediate_image_sizes_advanced filter, the image_resize_dimensions filter typically isn’t required too. However, combining both can help block image sizes created by custom cropping solutions used by some themes or plugins.
Disable media sizes plugin
Prefer a plugin instead? No worries! We have everything covered! You can use the Disable Media Sizes plugin and just use it!
This plugin will:
- Disable Thumbnail Size
- Disable Medium Size
- Disable Large Size
- Disable Medium Large (768px)
- Disable 1536×1536 Size
- Disable 2048×2048 Size
- Disable Big/Scaled Size
What if Extra Image Sizes Are Still Created?
If, after adding the snippet or plugin, your site still generates extra image versions on upload, there’s likely a theme or plugin on your site using its own way to crop images—outside of WordPress’s standard filters. Try deactivating themes and plugins one at a time to track down the cause.
Exclude Specific Image Sizes from Being Created on Upload
If you don’t want to block all image resizing but only specific sizes, you can modify the filter as shown below:
// Exclude certain image sizes from being generated on upload
add_filter( 'intermediate_image_sizes_advanced', function( $sizes ) {
	$sizes_to_exclude = [
		'thumbnail',
		'medium',
		'large',
		'medium_large',
		'1536×1536',
		'2048×2048',
	];
	foreach ( $sizes_to_exclude as $size_to_exclude ) {
		unset( $sizes[ $size_to_exclude ] );
	}
    return $sizes;
} );
If you use this method, avoid returning false from image_resize_dimensions—otherwise, all cropping will be blocked.
This example targets thumbnail, medium, and large sizes for exclusion—making sure those aren’t created, even if someone changes the settings from your admin panel.
Tips for Reducing the Need for Resized Images
Given the reasons WordPress creates multiple versions of images, here are some practical steps to minimize problems when disabling extra image generation:
- Avoid Uploading Oversized Files: Only upload images that are reasonably sized for your needs. If others can upload, consider keeping the big image threshold enabled for safety.
- Upload Images that are ‘Large Enough’: “Large enough” depends on your layout and audience, but images should look sharp on modern screens without being needlessly large in file size.
- Pre-Optimize Images: Many image optimization plugins exist, but handling this before upload is even better. Tools like tinypng.com are quick, and saving images in webP format offers further improvements.
- Utilize Aspect Ratios with CSS: Instead of depending on cropped images for uniformity, use the CSS aspect-ratio property to keep your layout visually consistent.
Following these practices minimizes the risk of huge images slowing down your site or causing layout issues. If you have more tips or concerns, feel free to share in the comments!
How to Remove Old Image Sizes from Your Server
Disabling image sizes only stops their creation for new uploads—it won’t clean up previously generated files. If you’ve updated your settings or applied new code on an existing site, you’ll want to clear out old, unused cropped images.
Avoid using direct deletion from the command line, because WordPress stores image metadata that can get out of sync. The simplest cleanup method is to use the Force Regenerate Thumbnails plugin. Activate it, run the process, and then deactivate or uninstall when done.
This plugin cycles through each attachment, removes all defined sizes based on attachment metadata, and triggers WordPress to generate new ones for each file if needed. If you’ve blocked extra image sizes using the snippets above, only originals will be recreated.
While there are code-based methods for cleanup, they’re resource-intensive and best handled via plugins like this one, which also logs results and provides you with feedback on the process.
Always back up your site before removing files or installing cleanup plugins. While these tools are usually trouble-free, having a backup gives you peace of mind.
Understanding How WordPress Chooses Image Sizes for Different Contexts
WordPress uses a function called wp_get_attachment_image_srcset() to choose which image size to display in different contexts, like galleries, featured images, or content blocks. This is why you might see several image size variations referenced in your HTML’s srcset attribute. Browsers automatically select the most suitable image size for the user’s screen—helping maintain fast load times and crisp visuals. If you remove image sizes that are frequently referenced in your theme or plugins, be aware this could impact the display on certain devices or in particular layouts.
Real-World Examples: When Minimal Image Sizes Make Sense
- Portfolio Sites: Photographers and designers often want control over every image. Limiting sizes ensures only intentional versions are shared.
- Brochure Websites: Small business or landing page sites with minimal galleries or image needs often benefit from reduced image size bloat.
- Membership or Intranet Sites: Private networks where bandwidth and storage are precious may prioritize streamlined media folders.
- API/Headless WordPress: Sites serving images directly to apps or external frameworks can limit what is generated for tighter integration and faster API responses.
Plugins That Commonly Register Extra Image Sizes
It’s helpful to know which plugins typically add custom image sizes so you can anticipate what to check after installation or updates. Common plugin categories include:
- Page builders: Elementor, WPBakery, Divi, Beaver Builder, etc.
- eCommerce: WooCommerce often adds its own image sizes for product listings, single product views, and galleries.
- Events & Directories: The Events Calendar, Business Directory Plugin, and others require specific thumbnail and detail view images.
- Social Sharing & SEO: Plugins like Yoast SEO or Smash Balloon (for social feeds) may register open graph or social-specific image crops.
- Slider & Gallery Plugins: NextGEN Gallery, MetaSlider, and similar tools often create thumbnails, medium, and large versions for custom displays.
Checking plugin documentation and settings—sometimes buried under plugin-specific menus or “advanced” tabs—can prevent unnecessary growth in your uploads folder.
Automating Image Optimization During Upload
Instead of solely relying on WordPress image sizes, many site owners benefit from automated optimization tools and CDNs. Services like ImageKit or Cloudinary can:
- Automatically resize, compress, and serve the best format per device (e.g., WebP or AVIF instead of JPEG/PNG).
- Only store originals on your server, freeing WordPress from having to create multiple sizes on upload.
- Bulk-optimize existing libraries, reducing storage even further.
These services often integrate with WordPress via plugins and can be a robust long-term solution for media-heavy sites.
Removing Old Image Sizes via WP-CLI
If you’re comfortable with command-line tools and have proper backups, WP-CLI’s media regenerate command is another efficient way to purge unused image sizes and regenerate only the ones you need:
wp media regenerate --skip-deleteOr, to delete images for sizes no longer registered (use with caution and back up your uploads folder first):
wp media regenerate --yesThis is especially helpful for larger sites, or if automated processes (like deployment pipelines or multisite networks) are part of your workflow.
Potential Drawbacks of Disabling All Extra Image Sizes
- Loss of Responsiveness: Disabling all variants may lead to suboptimal display on different devices.
- Theme/Layout Issues: Some layouts or blocks may assume the presence of certain sizes—breaking alignment or creating stretched images.
- Plugin Conflicts: Certain gallery sliders, social tools, or widgets may require specific sizes for proper function.
- User Experience: Large, uncompressed images delivered to mobile users could cause slowdowns.
Consider testing key pages thoroughly on multiple devices before going live with these changes. A development or staging site is best for validation.
Best Practices for Ongoing Media Library Maintenance
- Regularly Audit Your Site: Review registered image sizes after every major theme or plugin update.
- Choose Plugins Carefully: Prefer plugins that provide granular settings for media and do not create unnecessary image sizes by default.
- Educate Collaborators: Train your team or clients to upload sized-and-optimized images and understand why storing only one or two versions is preferred.
- Backup Before Major Changes: Whenever deleting images or running bulk optimization tools, maintain fresh and tested backups.
Conclusion
For many websites, turning off unnecessary image resizing is the best option. It keeps your server lean, reduces wasted storage, and makes site backups more efficient.
There’s also a potential SEO advantage to not having multiple redundant image files floating around—though this area isn’t fully explored yet. If you’re experienced in Google Image Search Optimization, feel free to share insights in the comments!